THE SEUCK VAULT
Main | Menus | Archive | Tips | Links | Contact
EDIT OBJECTS MENU
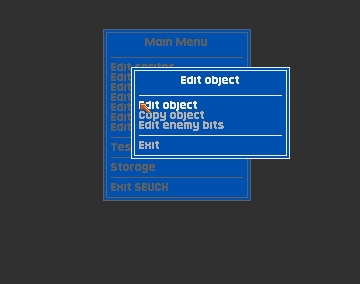
Once you have drawn all your sprites you must combine them as `objects` for continous or directional animation during the game.


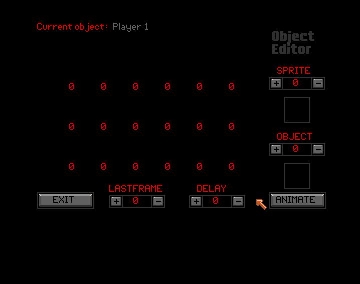
Displays the object editing window. Now you can`t actually alter any graphics here,but you can combine them to make an animated object for use as a player,enemy,bullet or explosion. Clicking on the + and - buttons marked object number will let you examine the currently stored objects(if any have been loaded or drawn)
Notice the names of the objects, like player 1, player 2, enemy explosion ect...are typed at the top of the screen as each object is selected. These objects always perform the same function in every game. But the shape and animation is up to you. Make sure that you place the right graphics in the right objects. You would`nt want to end up firing enemy ships at little bullets, now would you?
To place sprites in the object,just select a sprite graphic with the + and - buttons on sprite number, then click the mouse pointer on one of the object frames and the sprite will appear there with its number underneath, In ANIMATE mode, the frames will be in rows, and in DIRECT mode the frames will be grouped in two`s at all eight (8) joystick directions.
The DIRECT button with the little picture over it is a window for testing animation. In DIRECT mode the object in the window reacts to movement from the joystick. Notice that the graphics are arranged with down,centre,up-left,up-right,down-left,down-right. The reason there are two graphics at this point is that they animate between the two when the joystic is in that position. In the preset example the two graphics at each point are the same, so they stay still. Try moving the joystick(in port 2) and check out the directional movement in the little window.
Clicking on the DIRECT button alters it to ANIMATE.(and vice versa) and in ANIMATE mode you can do up to an 18 frame animation within the object squares. Step up the LAST FRAME + and - buttons to set the amount of frames you want to animate, bearing in mind the first frame is 0. Once again, in ANIMATE mode, you can preview the animation in the little window. The DELAY button sets the pause between sprites, less pause means the animation moves faster. The NO HOLD button is another toggle button like ANIMATE/DIRECT. This control sets, when you push an object in a direction, whether it stays pointing in that direction or resets to pointing forwards when you release the joystick.
You can paste one object`s graphics from the current number to any of the other numbers from 0-55. BUT...only if the object is of the same type, ie Bullet, Enemy,ect...This can save a lot of redrawing if some of the objects are going to be fairly similar. The NO HOLD and ANIMATE buttons wont work in this mode, by the way.

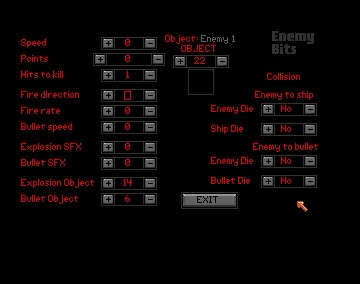
This is the same as `PLAYER ATTRIBUTES` menu, with special switches to set amount of hits the enemy can take, and various other personality traits like how many bullets it can have onscreen at one time, rate of fire, direction of fire, and so forth.
The speed option sets the speed of the enemy object along its path, on a range from 0-10. Setting the speed to 0 means the object is stationery.
Points sets the amount of points scored by the player when he blows this enemy up. the range is 0-10000.
Hits to Kill is obviously the amount of times the player has to shoot and hit the enemy to blow it up. in a range from 1-10
Fire Direction describes the directions that the enemy fires in,and clicking on the box (no firing)it goes to four way (up,down,left,right) firing, four way diagonal firing, firing up only, down only, left only, right only, up-left, up-right, down-left, down right only, plus R for random firing and D for directional. In RANDOM the fire direction is randomly generated from all of the above. Selecting DIRECTIONAL means the enemy only fires in the direction of its movement.
Fire Rate is the period between shots; 100 is equal to not much firing and 0 is very rapid firing, almost too fast.
Bullet Speed is the rate at which the bullets travel once released from the enemy. 0 is stationery, and 15 is fast.
Use both these options to select a rate and speed suitable for your enemies.
In the same way you can assign graphics to each bullet and explosion, you can also assign sound FX. The Explosion FX and Bullet FX options do this for you. All you have to do is select from the sound effects 0-49
which you`d like to represent the sounds of the enemy blowing up or the enemy firing, and these will be stored ready for the game.
The EXPLOSION OBJECT and BULLET OBJECT buttons let you select which bullet graphics and explosion graphics you want to assign to the current object. The eight (8) bullet objects lie between object 6 and object 13 and the eight(8) enemy explosions lie between 14 and 21.
Collision detection for this enemy is handled on the remaining Enemy to Ship and Enemy to Bullet Buttons. ENEMY TO SHIP tells the computer if you hit an enemy with your ship, whether the enemy will blow up, you blow up or you both blow up, If you want the enemy to blow up, click the ENEMY DIE box to yes. If you want your ship to blow up, click the SHIP to DIE box to yes. If you want both to be blown up, click them both to yes. Obviously if you want them both to be intact after collision, click them both to no.
Similarly, If you want the enemy to die on collision with a bullet, click the ENEMY DIE box in ENEMY to Bullet to yes. If you want the bullet to blow up too, then click Bullet to die too. If you`d like the enemy to be invulnerable, however (and why not?), then click the Enemy to Die box to no. If the same goes for your bullet, then click Bullet die to no too.